Learning lino print - Practice makes perfect, ish
- Michelle Hughes
- Mar 31, 2022
- 8 min read

Updated: Mar 12
How often do we think we need to be an expert at something the first time that we try it?
It's something I've been reflecting on while out on long walks. Two years ago, I did a two-day navigation course in the Yorkshire Dales. I now think I should be an expert at navigation and happy in the mountains. But I’m not. I live in the Vale of York. I don’t get up mountains very often. So I’m not going to be super confident the first time around. It’s going to take practice, and it’s going to take time. I need to stop giving myself a hard time if I feel anxious or take a wrong turn.
A reminder that we don’t always get things right the first time around. A reminder that we learn as we go. A reminder to myself that we don’t become an expert on day one of learning something new.
And the one thing to remember most of all? It is to enjoy the journey, rather than focusing on the end result.
So if you are doing one of my online courses, have been to my workshops or are teaching yourself. Don’t be too hard on yourself. I’ve been practising and making linocut prints properly for nearly 6 years and still have a lot to learn!
Perfectionism
Hands up. I am a perfectionist. Or, as the way I prefer to frame it, I have high standards. That’s all very well and good, but if I’m learning a new skill, whether that’s baking bread, wood turning or yoga. I’m not going to be an expert after just one lesson or course.
But how many of us really do think that? We try something new. In our minds, what we’ve made is rubbish, or we’re no good at it. It doesn’t meet our very high expectations, and we are disappointed. Maybe give it a few more goes, then we give up. I was a bit like that with mountain biking. I’m technically not very good. Risk-averse and a bit timid. I used to berate myself for not whizzing down a steep, rocky trail when my friends could. But just maybe I needed extra lessons that were right for me and a bit more time. Don’t we all learn at different speeds and in different ways? Maybe it was just about having fun. Maybe it was about finding people to cycle with who were at a similar level.
Lower your expectations
Teaching linocut workshops has taught me many things. One of which relates to the above. Some students come along saying “I can’t draw” or “I’m not creative”, while others have an array of crafts and creative hobbies. What I absolutely love is seeing how the first students blossom throughout the day. Their faces when they peel back the paper to reveal their first lino print are priceless. I confess I often have a ‘proud mum’ tear in my eye. I suspect their joy, in many ways, is about having low expectations of what they’d make. They booked a workshop to give something new a go, without the aspiration of becoming an expert at it in one day.
Enjoy the process
And there lies the secret. The joy of making is not about the finished product. It’s about the process. I could quite happily carve and print linocuts until the cows come home. I get completely absorbed in what I’m doing in the state of creative flow. I’m the same with baking, sewing, upcycling stuff and DIY. In fact, anything when I’m hands-on making something. That’s my meditation, my switching off, and my happy place.
Learning to linocut - my 1st linocut print
I first tried lino print in July 2013. There was a craft fair at the Merchant Adventurers' Hall in York. One of the makers had a 'have a go' table. I’d always liked the style of linocut and thought I’d have a go.
This is the hedgehog I carved and printed there. Does anyone know who it might have been? I have a hell of a lot to thank them for giving me the linocutting bug!
Photos
Hedgehog lino print - July 2013


At the time, I was design manager for the cook and dine range for George Home at Asda. My job was quite full on, and I was often thinking about ideas at home. It left little headspace for my own creations. Any spare time I had was spent getting away from it all and gardening, walking or cycling. I did a bit of lino cutting for some tableware designs at work and a few lino prints for myself, but not much.
Time to play
It wasn't until I was made redundant in January 2016 that I found the time to play with lino properly.
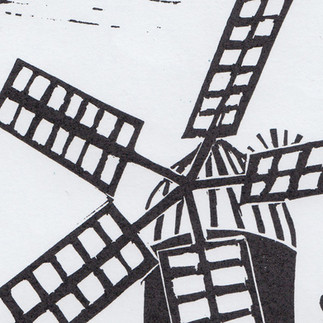
I’ve been having a spring clean and sorting out over Christmas and the New Year. I realised that I’d carved and printed a lino print of Holgate Windmill five times before I was happy with it. Yes five!

This is what prompted me to write this blog. Firstly, it takes time and practice to learn a new skill. Secondly, to reflect on how my skills have developed over time.
I thought it would be useful for you to see this progression, too. The linocuts my students make are far better than any of my early creations! You’ll also see how my methods have changed as I’ve learnt. Apart from that first ‘have a go’ session, I’m self-taught. I think crafting is in my DNA. I bought a few books on stamping, and off I went, and to a point, made it up as I went along. The joy of that is that I’ve had a huge learning curve. Some things have worked, and some things haven’t. Learning by mistake is one of the best ways of learning.
You’ll also see how my methods have changed as I’ve learnt. Apart from that first ‘have a go’ session, I’m self-taught. I think crafting is in my DNA. I bought a few books on stamping, and off I went, and to a point, made it up as I went along. The joy of that is that I’ve had a huge learning curve. Some things have worked, and some things haven’t. Learning by mistake is one of the best ways of learning.
Learn by mistake
Spot the deliberate mistake below? I forgot to reverse the design before carving the first lino print. Over the next 2 years, I learnt to carve straight lines and rectangular shapes more accurately. You can see how each design has evolved. The close-up images make me cringe, but I thought you’d find them useful to see!


Photos
Holgate Windmill lino print 1 - October 2015
Holgate Windmill lino print 2 - October 2015
Holgate Windmill lino print 3 - April 2016
Holgate Windmill lino print 4 - December 2016
Holgate Windmill lino print 5 - October 2017


Photos
Details from each Holgate Windmill linocut print in order of when I made them.
One-colour lino prints
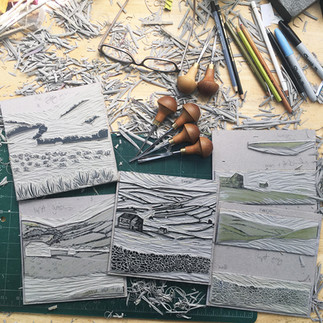
The best way to get to grips with lino printing is to make one-colour prints. These are some of the one colour prints I made when I first started. Some are carved into traditional lino, but most are SoftCut or easy carve lino. I used a beginner's set of Essdee lino tools for all of them. Although I had an inexpensive Essdee roller, I liked using my late grandad's old wallpaper roller. Most of the time, I printed on cheap wallpaper lining paper because it didn’t matter if I made mistakes. There’s nothing like expensive paper to give you creative block! Bear in mind that it isn’t acid-free and gets darker in colour over time when it’s exposed to light.


Photos
Robin lino print Christmas card - December 2013
Deer lino print Christmas card - December 2014
Hedgehog lino print - July 2016
Sea Days lino print - September 2016
Tree lino print Christmas card - December 2016
Hand-coloured lino prints
The easiest way to make a lino print multi-coloured is by hand colouring it. I used my old watercolour set from college. The designs were printed in Hawthorn’s oil-based ink, which meant the printing colour didn’t run or smudge.


Photos
Birds hand coloured lino print - May 2014
Pom hand coloured pom tree lino print - August 2016
Tree hand coloured lino print - April 2016
Printing with more than one colour: Jigsaw lino prints and printing with SoftCut lino shapes
I soon wanted to make multi-coloured prints with my oil-based inks. I’d bought a couple of books on stamping and printing with found objects. They used foam, rubbers or easy carve lino to make cut-out stamps.
This inspired me to try the lino print ideas below. They all use SoftCut lino and are printed by hand. I carved the design details first, then cut out the shapes. The jigsaw linocut designs were carved into one piece of linocut and then cut apart to form a jigsaw. The process means that the lino blocks can be inked up, arranged together and then printed in one go. This technique works best for SoftCut or easy carve lino. You need to be careful that the pieces don’t move as you hand-burnish them with a wooden spoon or similar (Hand-burnish means rubbing the back of the paper to transfer the ink from the block to the paper). I needed several hands and more fingers than I have to print some designs!


Photos
Teal Blooms lino print, using cut-out SoftCut lino shapes - July 2016
Yorkshire Dales 1 'jigsaw' lino print - July 2016
Blush Blooms lino print, using cut-out SoftCut lino shapes - August 2016
Autumn Trees 'jigsaw' lino print - December 2016
Partridge lino print, using cut-out SoftCut lino shapes - January 2017
Printing with more than one colour: Multi-block lino prints
In July 2017, I bought a Hawthorn Printmaker Supplies etching press. I discovered that SoftCut, or easy carve lino, is susceptible to movement when using an etching or roller press. In August, I bought some high-quality Pfeil lino cutting tools, which allowed me to carve the harder traditional grey hessian-backed lino. It’s more stable and prints better with a press.
My earlier designs used 2 lino blocks. Now I use up to 6 lino blocks. The fewer blocks there are, the easier registration is. Registration means the lining up of each colour being printed.


Photos
Hole of Horcum multi-block lino print - September 2017
Moon Gazing Hare multi-block lino print - December 2017
Robin Hood’s Bay multi-block lino print - January 2018
Curlew multi-block lino print - September 2018
Whitby Steps multi-block lino print - August 2018
Swaledale II multi-block lino print - May 2021
Langdale Pikes multi-block lino print - August 2021
Linocut and printmaking tools and materials
Find out more about the tools and equipment needed to create linocut prints in my 'lino cutting equipment' blog.
Learn How to Make Linocut Prints

Linocut Online Courses
Self-paced learning with step-by-step videos and guided projects.
Beginner’s Guide to Linocut Printing
How to Make a Multi-Block Linocut Print
Linocut Workshops in York
Small groups (max 4) for hands-on tuition in my print studio.
Level 1: Introduction to Linocut Printing
Level 2: “Jigsaw” Linocut Printing
Level 3: Multi-Block Linocut Printing

Linocut Book
Printing Birds and Wildlife in Linocut
by Michelle Hughes
A practical step-by-step guide for beginners and experienced printmakers.
If you’ve ever wanted to learn how to make linocut prints with confidence, whether it’s simple one-colour linocut prints or more advanced multi-block and reduction techniques, my new book will guide you through every stage of the process.
Sign up for my VIP list
for news on my latest releases, workshops and creative inspiration
I only send monthly (sometimes bi-monthly)
Happy linocutting!
Michelle
About the author
Michelle Hughes is a North Yorkshire landscape artist whose work celebrates the Yorkshire Coast, the Dales, and the North York Moors. She gathers inspiration while exploring the countryside on foot or by bike, camera at the ready.
Working from her garden studio, Michelle carves stylised silhouettes from her photographs into lino blocks and hand-prints each piece on an etching press using oil-based inks. All prints are handmade in limited editions.


Thank you Michelle. This is both reassuring and inspiring!