How I made Malham Cove linocut print
- Michelle Hughes
- Aug 31, 2021
- 5 min read

Updated: Feb 21, 2023
I use the multi-block method to create my multi-coloured linocut prints. Below I've outlined each of the stages used to make Malham Cove.
Step 1 | Inspiration
Malham Cove is a huge natural limestone cliff, which was once a spectacular waterfall. At the top of the cove is a limestone pavement and the landscape opens with panoramic views over Malham and Malhamdale.
It’s a place I’ve visited many times since I moved to Yorkshire. Last year I made two trips there to take photos as reference for some new linocut prints.
Read more about my inspiration and see photos from my walks and cycle rides in these two blogs:

Step 2 | Carving lino block 1
Carving lino block 1 for the trees.
This lino block took 60 minutes to carve.


Step 3 | Transferring the design from lino block 1 to blocks 2 and 3
Transferring the design from lino block 1 to blocks 2 and 3. I use the offset method to transfer the design from one block to another. This ensures each colour in the design will line up. I cover this in detail on my multi-block online course. I explain each stage through video tutorials, as well as step-by-step written instructions.


Step 4 | Carving lino block 2
Lino block 2 - the dark areas in the limestone, dry stone wall and rock highlights.
Once the design from lino block 1 is transferred onto lino block 2, I add extra details from my main sketch. In this instance I used a black ink to mark the areas that would remain in relief and be printed in charcoal grey. The green and blue indicate colours that are yet to be carved into other lino blocks.


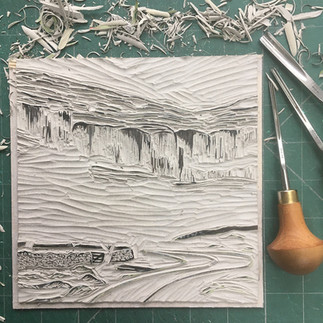
This block took 100 minutes to carve. See edited highlight in this 10 minutes video.
Step 5 | Transferring the design from lino block 2 to blocks 3 and 4
Using the offset method again, to transfer the design from lino block 2 to 3 and 4.

Step 6 | Carving lino block 3
Carving a lino block for the green grass and vegetation on the limestone.
This lino block took 45 minutes to carve.


Step 7 | Carving lino block 4
Carving a lino block for the pale grey tones in the limestone of Malham Cove, plus the river and highlights in the foreground. I often scribble black pencil on as I go to check my carving.
This lino block took 40 minutes to carve.


Step 8 | All lino blocks carved
All 4 lino blocks ready for test printing. I carefully clean the ink and pencil off before inking up the blocks, being careful not to get the hessian back of the lino or backing board wet.

Step 9 | Test printing and mixing colours
I spent a long time trying out different colours and tones. I was working on 2 other designs, Swaledale and Grassington, at the same time and wanted the designs to compliment each other. It took at least a day to get them right.
I often refer back to colours I’ve used in previous designs and use these if they work for the design.
For this design I tried 10 colour variations before I was happy with it. I test print on cheap white photocopy paper to begin with. It’s whiter than the paper I use for my final prints but I’ve got to understand the change in colour I’ll have for these.
In the end I decided on two colourways, one with a sage green grass and another with a more lime toned grass.I thought the trees looked better in different colours on each of these.
I also made some adjustments to the lino blocks , which you might spot in the final prints. These were more tweaks to the design, rather than any registration issues.


Step 10 | Printing colour 1
Once I’m happy with my test prints I’m ready to prepare my paper with Ternes Burton tabs which ensure each colour printed lines up. The term we use in printmaking is registered.
In printmaking you normally print light to dark. When I’m planning the printing of a design, this will vary depending on the effect I want. In this instance I wanted to print pale grey over the green to create an extra tone. Therefore I printed the green first.
I roll 4 thin layers of ink onto the block and place it into my registration device. The Ternes Burton tabs are then clicked onto the Ternes Burton pins. As I wind the handle of my printing press I allow the paper to drop onto the inked up surface of the lino block.


Step 11 | Printing colour 2
I use Hawthorn stay open oil-based inks that are semi-transparent. I make them paler by adding more transparent ink. As the pale grey has a high percentage of transparent ink in it, I’ve used it to create shadows on the grass and in effect, another colour.
Mixed inks with a lot of transparent ink in them can take a little longer to dry.


Step 12 | Printing colour 3
Inking up the block and printing with charcoal grey ink.


Video - Hand-printing dark grey ink for the limestone
Step 13 | Printing colour 4
Adding the final colour for the trees.


I then leave the prints to dry fully for 2 weeks before mounting or framing.
Video - Hand-printing the 4th colour for the trees

Step 14 | The final print


Hand-printed using 4 hand-carved lino blocks and oil-based inks.
Limited edition linocut print.
Varied edition of 60. Two colourways are available.
Image size 160 x 160mm
Mount aperture 190 x 190mm
Mount outer 305 x 305mm
Mounted £90
The first few prints are available in my online shop.

Would you like to learn how to make a linocut print using this multi-block technique?
How to make a multi-block linocut print
Learn how to make a two and three-colour linocut print at home, using the multi-block technique.
Online self-paced learning.
Full access for one year, so that you can study at your own pace and home.
Instructional videos and step-by-step guides.
If you're a complete beginner, see my Beginners Guide to Linocut Printing online course or my Introduction to Linocut Printing workshop.
See my linocut workshops and online courses page for links to each of my courses and workshops.
Let me know what you think...
I always love to hear your feedback on new designs. Please do comment below or get in touch. To be first to hear about my new work, exhibitions and events, join my mailing list.
Michelle
About the author
Michelle Hughes is a North Yorkshire landscape artist. Much of her work depicts the Yorkshire landscape and Yorkshire coast, including the Yorkshire Dales and North York Moors.
Michelle loves exploring the British countryside by bike or on foot, camera in hand, capturing ideas for her next linocut prints. Back in her garden studio, Michelle creates simple but stylised silhouettes based on her photographs, and hand carves these shapes into lino. She hand prints with an etching press, using oil-based inks to create tonal blocks of colour.
Michelle’s original linocut prints are limited editions.


Comments