How I made my Robin Hood’s Bay 3 linocut print
- Michelle Hughes
- Jun 21, 2021
- 4 min read

Updated: Feb 21, 2023
In this blog, I'll show you how I created my new Robin Hood’s Bay 3 linocut print. The design is a 4 colour print made using the multi-block print technique. This is where the design for each colour is carved into a separate block. Unlike the reduction method of lino printing, this method gives me the flexibility to print some of the edition to begin with and then go back and print more at a later date.
Step 1 | Inspiration
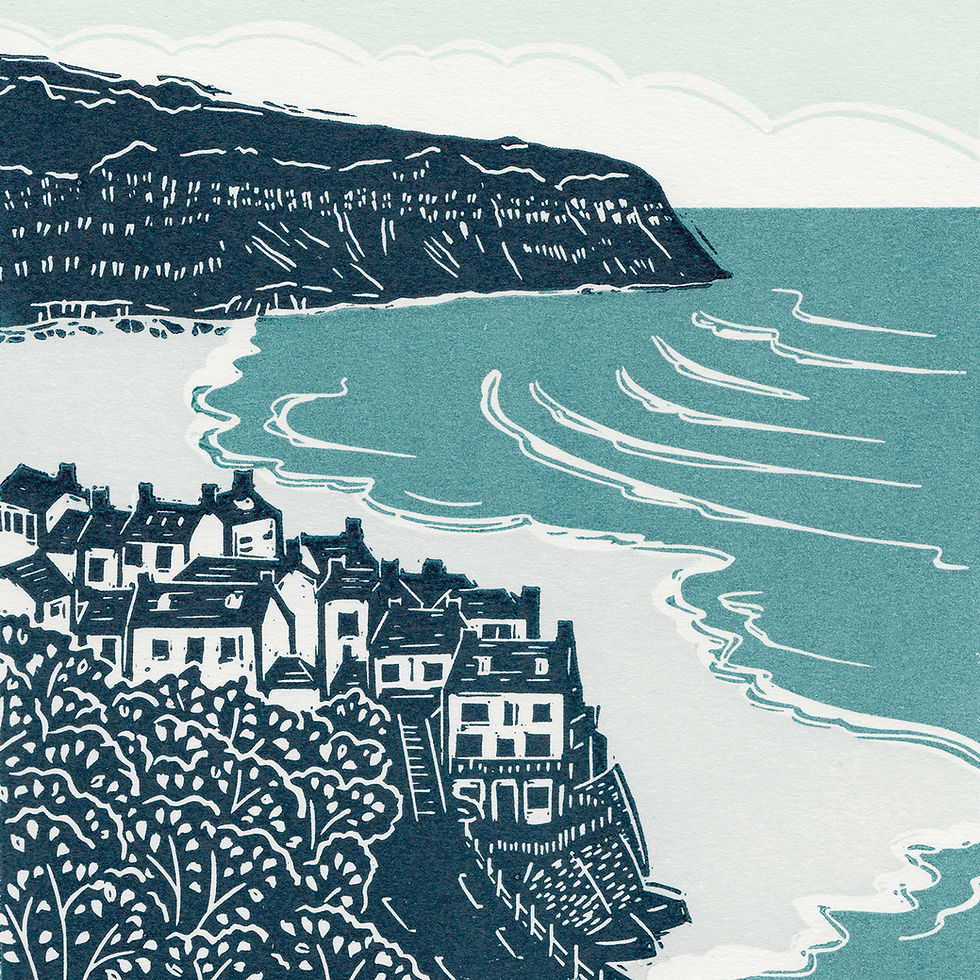
The inspiration for this design comes from a walk along the Cleveland Way on the Yorkshire Coast with a friend. It’s a favourite walk. Starting at Ravenscar, the path goes along the cliff tops, past the old alum works. I recommend checking the tide times. At low tide, you can go down onto the beach at Boggle Hole and walk along to Robin Hood’s Bay.
The photo I took that inspired this print, is looking back to Robin Hood’s Bay, as we walked towards Ravenscar along the cliff tops. We met a lovely couple sitting there soaking in the view of the bay.
Step 2 | Carving lino block 1
Carving the main elements of the design into the key block.
This block took 100 minutes to initially carve the block and another 15 minutes to make adjustments to it once I’d test-printed it. I set a timer to 10 minutes, take a break and then carve for another 10 minutes. It requires a lot of concentration and I find I make fewer mistakes that way.


Step 3 | Transferring the design from lino block 1 to block 2
I use the offset method to transfer the design from one block to another. This ensures each colour in the design will line up. I cover this in detail in my multi-block online course. I explain each stage through video tutorials, as well as step-by-step written instructions.

Step 4 | Carving lino block 2
Carving a lino block for the sea.


Step 5 | Carving lino block 3
Carving a lino block for the sand.


Step 6 | Carving lino block 4
Carving a lino block for the sky.

Step 7 | All lino blocks carved
Each of the four lino blocks is ready for test printing. I clean the ink, pen and pencil off first.

Step 8 | Test printing and mixing colours
Once all the lino blocks are carved I test print them. This is primarily to see if the blocks need any adjustment and line up correctly. I was fairly confident about the colours I would use on this design, so just tried out a few ideas for the sand: a couple of grey tones, sand and without that block printed at all. I decided that the grey tone worked best. The sand was definitely too much like ice cream!


Step 9 | Printing colour 1
I usually print light to dark, although I often print skies last if they’re not adjacent to other areas of printing. In this design, I printed the sea first. I use Hawthorn Printmaking Supplies stay-open oil-based inks. They’re semi-transparent which means there's a real depth to the colours. This is one of the colours I use a lot for seascapes, a combination of 4 different colours that I’ve mixed.


For each colour, I roll several layers of ink onto my lino block. I then place the block in my etching press. Put paper onto. Wind the handle and lift the paper. I repeat this for each colour and each print.
Step 10 | Printing colour 2
I leave 2-3 days of drying time between colours. Next, I printed the sand using a bluey grey tone. This has lots of transparent ink in it to make it paler.


Step 11 | Printing colour 3
Inking up the key block with indigo blue.


Step 12 | Printing colour 4
Inking up the block with a very pale blue. It’s very hard to see this on the lino block, so I have to count the number of rolls of ink I do. Usually 4-6 rolls.

Step 14 | The final print
I print small amounts of the print edition, to begin with. Usually between 10 and 20. I often reject quite a few the first time I print a design for printing mistakes and imperfections. I then get to know the individual quirks of each lino block and mixed ink.


Limited edition linocut print. Edition of 60
Image size 160 x 160mm
Mount outer 305 x 305mm
Mounted £90
The first 10 prints are available in my online shop.
Let me know what you think...
I always love to hear your feedback on new designs. Please do comment below or get in touch. To be first to hear about my new work, exhibitions and events, join my mailing list.
Michelle

Would you like to learn how to make a linocut print?
Online courses
Online self-paced learning. Full access for one year, so that you can study at your own pace and home. Instructional videos and step-by-step guides.
Beginners guide to linocut printing
How to make a multi-block linocut print
Linocut workshops
My linocut workshops are all held in my York print studio. I teach in small groups of no more than four people, so that everyone gets lots of one to one tuition.
Introduction to linocut printing workshop
Follow on 'jigsaw' linocut printing workshop
See my linocut workshops and online courses page for links to each of my courses and workshops.
Linocut and printmaking tools and materials
Find out more about the tools and equipment needed to create linocut prints in my 'lino cutting equipment' blog.
See step-by-step how I make my linocut prints
See examples of how I make my linocut prints in the Studio Diary section of my blog.
To be first to hear about my latest designs, online courses and workshops please join my mailing list.
Happy linocutting!
Michelle
About the author
Michelle Hughes is a North Yorkshire landscape artist. Much of her work depicts the Yorkshire landscape and Yorkshire coast, including the Yorkshire Dales and North York Moors.
Michelle loves exploring the British countryside by bike or on foot, camera in hand, capturing ideas for her next linocut prints. Back in her garden studio, Michelle creates simple but stylised silhouettes based on her photographs, and hand carves these shapes into lino. She hand prints with an etching press, using oil-based inks to create tonal blocks of colour.
Michelle’s original linocut prints are limited editions.


Comments